top of page

Spring, 2017
Room Design
As the end of the school year approaches, our class did a room design project as one of our last units. When we were creating our rooms, we had to measure out the actual size of the room we wanted in our house. I used a graph paper and measured out my room with 1 feet being 1-square-box length. This proved a bit small, but got the job done. I then layed everything out on Revit, and then found furniture online I thought would fit well in my room. Here is a mini gallery showing the process of remodeling my bedroom.
 Here is an image of my (dream) room with measurements. The extra room behind my closet was an addition from my imaginations. It is like a secret hideout! |  This is my room furnished the way I would want it. I included a work desk, a dresser, and some lighting. |
|---|---|
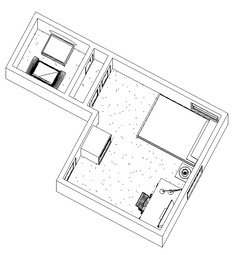 Here is the room in 3D view. You can see some more details of each furniture. |  I used the section tool to get a sideview of the main room. This helped me place things on top of each other, like the lamp on the table. |
 Using the camera tool, I got a snapshot of what the hideout room would look like. I included a comfy couch, a bookshelf, and a round window to look outside. |  Here is another view of the main room, using the camera tool. |
 Here is another view of the room with a render. This image shows the huge difference between just layed out and being rendered. It looks much better than the last image. |  Here is a view of the room with a render. I did not have time to render a whole video in, so I took some screenshots of what it would like like. |
 This is the hideout room. It is very cramped, but fits in a white bookshelf and a gray couch. I tried to find a good texture to fit on the window, but could not find any. |
bottom of page